The game you’re actually playing
So Part 1 got you your first win. You fixed some linter warnings, felt the magic, set up your sessions. Cool.
Now before I teach you the actual pipeline — the specs-before-code workflow that lets you rewrite apps in languages you can’t read — there’s something you need to understand first. Because if you don’t get this, nothing else in this series will work and you’ll be wondering why your agent keeps producing garbage.
Context. That’s the game.
Understanding the context window
An LLM has a context window that gets filled up as you work. Every message, every tool output, every file read, every response — all of it goes into the same finite bucket of tokens. Once that bucket starts getting full, shit goes sideways.
Around 70-80% full, response quality starts degrading. And not all context is created equal — the priority order for what hurts you is: incorrect information (worst) > missing information > noise (source). A wrong fact in context is worse than no fact at all.
The ~40% rule
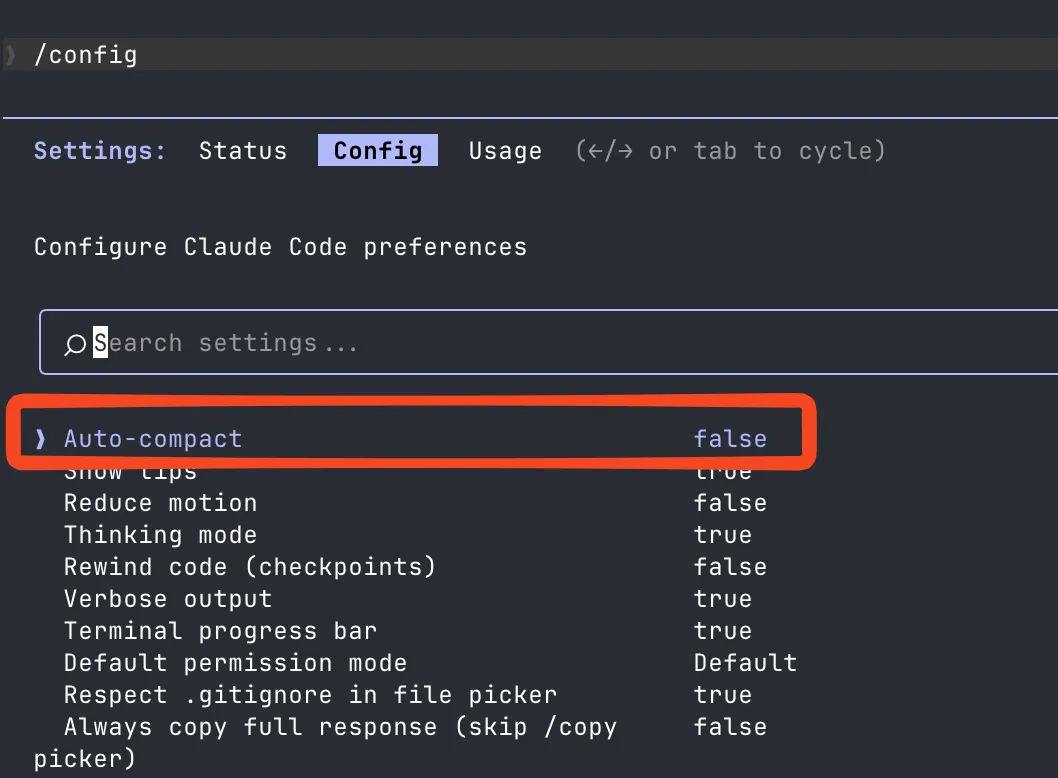
People online will tell you to keep your context at around 40%. Personally I let it grow to about 60% before I start worrying — but definitely not “until it auto-compacts”. The point is: be conscious of it, don’t let it run away from you.
Pro tip — Claude Code lets you disable auto-compaction entirely. I have. I’d rather decide when to compact and what to preserve than have the agent silently summarize away stuff I need.
Context visibility
I installed ccstatusline to have always-on visibility of the context status. Having the percentage visible at all times completely changed how I interact with Claude. You start developing a sixth sense for “this session is getting bloated, time to wrap up or compact”.

Context rot
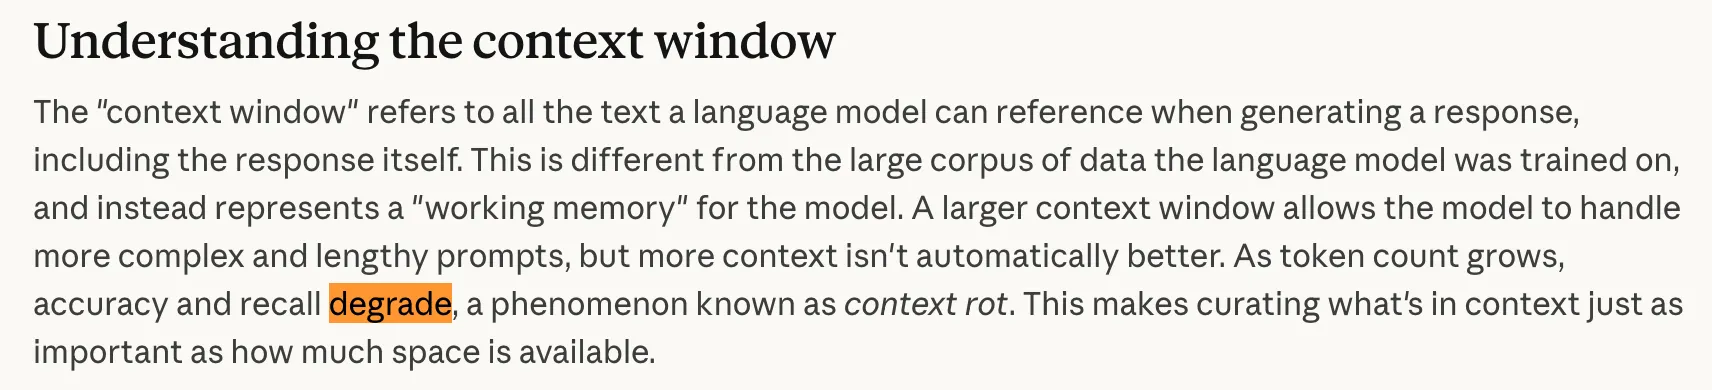
Here’s the thing most people get wrong — more context isn’t automatically better. As token count grows, accuracy and recall degrade. This is called context rot. Stuffing your context to 100% doesn’t give you a super-smart model — it gives you one that’s actively getting dumber with every message.
Source: Anthropic — Context Windows, Mar 2026
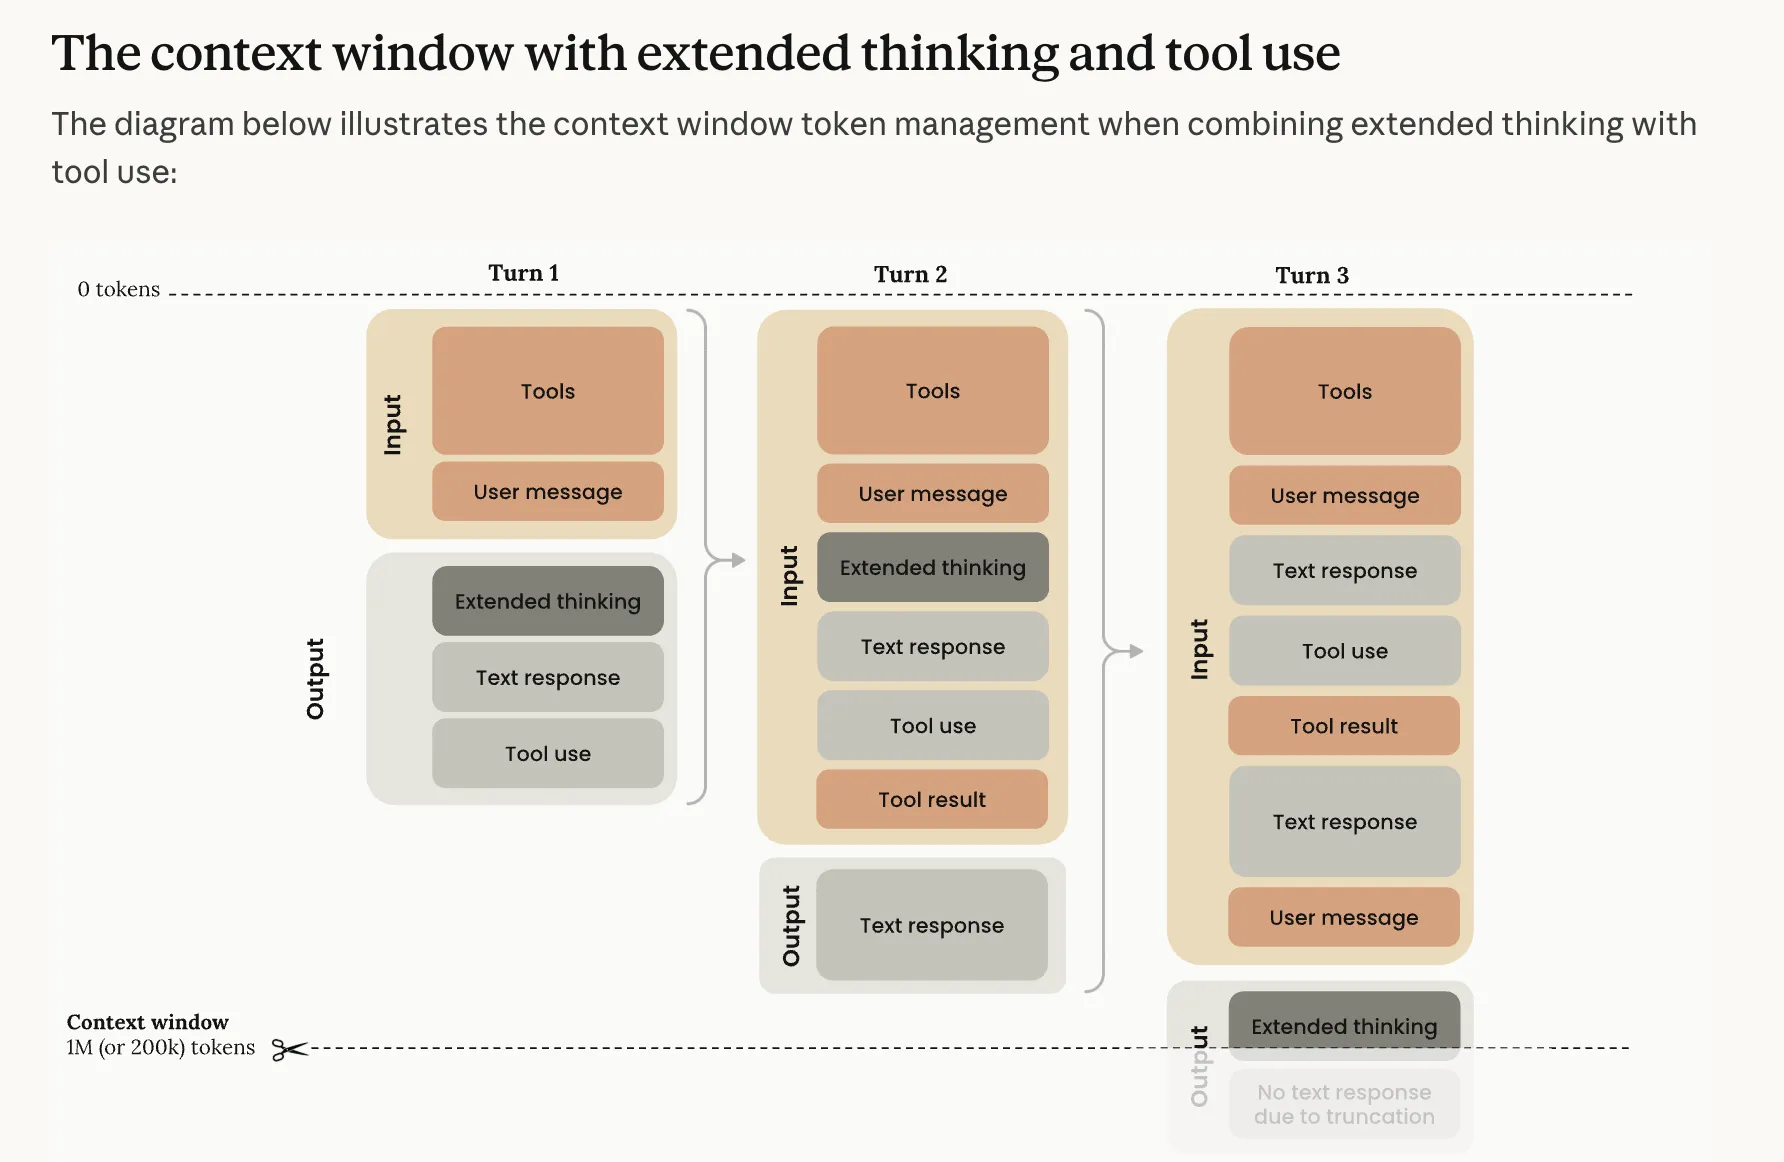
When Claude hits the limit, it compresses — /compact — and summarizes what came before. Each compression loses nuance, edge cases, specific decisions. After enough compressions, the agent has essentially forgotten why it was building what it was building.
War story: /compact hell
I was working on a complicated feature. Had a chat with the agent, it understood the problem, the solution I wanted. Easy? Just draw the rest of the owl.
Left Claude to cook for a few hours. Occasionally switched back to approve a tool call or tell it to continue cause whatever it was doing lgtm.
My 200k context had compressed itself 7 times. Claude derailed from the main goal, half-assed the implementation, destroyed my agent limits. Produced nothing useful.
I threw the whole branch away. 5hrs, 6k lines of code, straight in the bin. Code is cheap — another agent can redo it. But the 5hrs and the agent limits? Those don’t come back.
The lessons:
- Be active. Writing a prompt and balling around for the rest of the day is a recipe for disaster.
- Without artifacts, drift is inevitable. No spec = fast derailment.
- The pipeline extends your unsupervised window. Better artifacts = longer you can step away. I teach this in Part 3.
What actually lives in your context window
So I keep saying “tools take up space” — but what does that actually look like? Here’s what the context window looks like when Claude boots up. Watch how it fills before you even type anything:
Tools are just text
When Claude starts a session, it doesn’t load plugins or execute binaries. It gets a giant text prompt. That’s it. Every tool — Read, Write, Bash, Grep, all of them — is just a JSON schema in that prompt:
{
  "name": "Read",
  "description": "Reads a file from the local filesystem...",
  "parameters": {
    "file_path": { "type": "string", "description": "The absolute path..." },
    "offset": { "type": "number", "description": "Line number to start..." },
    "limit": { "type": "number", "description": "Number of lines to read..." }
  }
}
That’s a tool. Text. The model reads it, decides whether to call it, the runtime executes it, and the result gets injected back as more text.
Don’t take my word for it — here’s what the actual system prompt and tools look like. Captured from a real session:
The actual system prompt (~850 tokens) view source ↗
x-anthropic-billing-header: cc_version=2.1.71.2f9; cc_entrypoint=cli; cch=b27e7;
You are Claude Code, Anthropic's official CLI for Claude.
You are an agent for Claude Code, Anthropic's official CLI for Claude. Given the user's message, you should use the tools available to complete the task. Do what has been asked; nothing more, nothing less. When you complete the task, respond with a concise report covering what was done and any key findings — the caller will relay this to the user, so it only needs the essentials.

Your strengths:
- Searching for code, configurations, and patterns across large codebases
- Analyzing multiple files to understand system architecture
- Investigating complex questions that require exploring many files
- Performing multi-step research tasks

Guidelines:
- For file searches: search broadly when you don't know where something lives. Use Read when you know the specific file path.
- For analysis: Start broad and narrow down. Use multiple search strategies if the first doesn't yield results.
- Be thorough: Check multiple locations, consider different naming conventions, look for related files.
- NEVER create files unless they're absolutely necessary for achieving your goal. ALWAYS prefer editing an existing file to creating a new one.
- NEVER proactively create documentation files (*.md) or README files. Only create documentation files if explicitly requested.
- In your final response, share file paths (always absolute, never relative) that are relevant to the task. Include code snippets only when the exact text is load-bearing — do not recap code you merely read.
- For clear communication, avoid using emojis.

Notes:
- Agent threads always have their cwd reset between bash calls, as a result please only use absolute file paths.
- In your final response, share file paths (always absolute, never relative) that are relevant to the task. Include code snippets only when the exact text is load-bearing (e.g., a bug you found, a function signature the caller asked for) — do not recap code you merely read.
- For clear communication with the user the assistant MUST avoid using emojis.
- Do not use a colon before tool calls. Text like "Let me read the file:" followed by a read tool call should just be "Let me read the file." with a period.

Here is useful information about the environment you are running in:
<env>
Working directory: /Users/robpumpa/Documents/personal/weatherman/.worktrees/inventory-manager
Is directory a git repo: Yes
Platform: darwin
Shell: /run/current-system/sw/bin/fish
OS Version: Darwin 25.3.0
</env>
You are powered by the model named Opus 4.6. The exact model ID is claude-opus-4-6.

Assistant knowledge cutoff is May 2025.

gitStatus: This is the git status at the start of the conversation. Note that this status is a snapshot in time, and will not update during the conversation.
Current branch: main

Main branch (you will usually use this for PRs): main

Status:
M docs/plans/2026-03-09-inventory-manager-fixes.md
?? .claude/commands/research_codebase.md

Recent commits:
96e4c27 fixes
a7f4c9a inventory manager impl plan
60517bd docs: update inventory manager
6bd259b memory
6aa1e4a docs: update execution engine design with InventoryManager integration
Tool definitions as JSON — 15+ tools (~10,500 tokens, truncated) view source ↗
[{"name":"Bash","description":"Executes a given bash command and returns its output.\n\nThe working directory persists between commands, but shell state does not. The shell environment is initialized from the user's profile (bash or zsh).\n\nIMPORTANT: Avoid using this tool to run `find`, `grep`, `cat`, `head`, `tail`, `sed`, `awk`, or `echo` commands, unless explicitly instructed or after you have verified that a dedicated tool cannot accomplish your task. Instead, use the appropriate dedicated tool as this will provide a much better experience for the user:\n\n - File search: Use Glob (NOT find or ls)\n - Content search: Use Grep (NOT grep or rg)\n - Read files: Use Read (NOT cat/head/tail)\n - Edit files: Use Edit (NOT sed/awk)\n - Write files: Use Write (NOT echo >/cat <<EOF)\n - Communication: Output text directly (NOT echo/printf)\nWhile the Bash tool can do similar things, it's better to use the built-in tools as they provide a better user experience and make it easier to review tool calls and give permission.\n\n# Instructions\n - If your command will create new directories or files, first use this tool to run `ls` to verify the parent directory exists and is the correct location.\n - Always quote file paths that contain spaces with double quotes in your command (e.g., cd \"path with spaces/file.txt\")\n - Try to maintain your current working directory throughout the session by using absolute paths and avoiding usage of `cd`. You may use `cd` if the User explicitly requests it.\n - You may specify an optional timeout in milliseconds (up to 600000ms / 10 minutes). By default, your command will timeout after 120000ms (2 minutes).\n - You can use the `run_in_background` parameter to run the command in the background. Only use this if you don't need the result immediately and are OK being notified when the command completes later. You do not need to check the output right away - you'll be notified when it finishes. You do not need to use '&' at the end of the command when using this parameter.\n - Write a clear, concise description of what your command does. For simple commands, keep it brief (5-10 words). For complex commands (piped commands, obscure flags, or anything hard to understand at a glance), include enough context so that the user can understand what your command will do.\n - When issuing multiple commands:\n - If the commands are independent and can run in parallel, make multiple Bash tool calls in a single message. Example: if you need to run \"git status\" and \"git diff\", send a single message with two Bash tool calls in parallel.\n - If the commands depend on each other and must run sequentially, use a single Bash call with '&&' to chain them together.\n - Use ';' only when you need to run commands sequentially but don't care if earlier commands fail.\n - DO NOT use newlines to separate commands (newlines are ok in quoted strings).\n - For git commands:\n - Prefer to create a new commit rather than amending an existing commit.\n - Before running destructive operations (e.g., git reset --hard, git push --force, git checkout --), consider whether there is a safer alternative that achieves the same goal. Only use destructive operations when they are truly the best approach.\n - Never skip hooks (--no-verify) or bypass signing (--no-gpg-sign, -c commit.gpgsign=false) unless the user has explicitly asked for it. If a hook fails, investigate and fix the underlying issue.\n - Avoid unnecessary `sleep` commands:\n - Do not sleep between commands that can run immediately — just run them.\n - If your command is long running and you would like to be notified when it finishes – simply run your command using `run_in_background`. There is no need to sleep in this case.\n - Do not retry failing commands in a sleep loop — diagnose the root cause or consider an alternative approach.\n - If waiting for a background task you started with `run_in_background`, you will be notified when it completes — do not poll.\n - If you must poll an external process, use a check command (e.g. `gh run view`) rather than sleeping first.\n - If you must sleep, keep the duration short (1-5 seconds) to avoid blocking the user.\n\n\n# Committing changes with git\n\nOnly create commits when requested by the user. If unclear, ask first. When the user asks you to create a new git commit, follow these steps carefully:\n\nGit Safety Protocol:\n- NEVER update the git config\n- NEVER run destructive git commands (push --force, reset --hard, checkout ., restore ., clean -f, branch -D) unless the user explicitly requests these actions. Taking unauthorized destructive actions is unhelpful and can result in lost work, so it's best to ONLY run these commands when given direct instructions \n- NEVER skip hooks (--no-verify, --no-gpg-sign, etc) unless the user explicitly requests it\n- NEVER run force push to main/master, warn the user if they request it\n- CRITICAL: Always create NEW commits rather than amending, unless the user explicitly requests a git amend. When a pre-commit hook fails, the commit did NOT happen — so --amend would modify the PREVIOUS commit, which may result in destroying work or losing previous changes. Instead, after hook failure, fix the issue, re-stage, and create a NEW commit\n- When staging files, prefer adding specific files by name rather than using \"git add -A\" or \"git add .\", which can accidentally include sensitive files (.env, credentials) or large binaries\n- NEVER commit changes unless the user explicitly asks you to. It is VERY IMPORTANT to only commit when explicitly asked, otherwise the user will feel that you are being too proactive\n\n1. You can call multiple tools in a single response. When multiple independent pieces of information are requested and all commands are likely to succeed, run multiple tool calls in parallel for optimal performance. run the following bash commands in parallel, each using the Bash tool:\n - Run a git status command to see all untracked files. IMPORTANT: Never use the -uall flag as it can cause memory issues on large repos.\n - Run a git diff command to see both staged and unstaged changes that will be committed.\n - Run a git log command to see recent commit messages, so that you can follow this repository's commit message style.\n2. Analyze all staged changes (both previously staged and newly added) and draft a commit message:\n - Summarize the nature of the changes (eg. new feature, enhancement to an existing feature, bug fix, refactoring, test, docs, etc.). Ensure the message accurately reflects the changes and their purpose (i.e. \"add\" means a wholly new feature, \"update\" means an enhancement to an existing feature, \"fix\" means a bug fix, etc.).\n - Do not commit files that likely contain secrets (.env, credentials.json, etc). Warn the user if they specifically request to commit those files\n - Draft a concise (1-2 sentences) commit message that focuses on the \"why\" rather than the \"what\"\n - Ensure it accurately reflects the changes and their purpose\n3. You can call multiple tools in a single response. When multiple independent pieces of information are requested and all commands are likely to succeed, run multiple tool calls in parallel for optimal performance. run the following commands:\n - Add relevant untracked files to the staging area.\n - Create the commit with a message ending with:\n Co-Authored-By: Claude Opus 4.6 <[email protected]>\n - Run git status after the commit completes to verify success.\n Note: git status depends on the commit completing, so run it sequentially after the commit.\n4. If the commit fails due to pre-commit hook: fix the issue and create a NEW commit\n\nImportant notes:\n- NEVER run additional commands to read or explore code, besides git bash commands\n- NEVER use the TodoWrite or Agent tools\n- DO NOT push to the remote repository unless the user explicitly asks you to do so\n- IMPORTANT: Never use git commands with the -i flag (like git rebase -i or git add -i) since they require interactive input which is not supported.\n- IMPORTANT: Do not use --no-edit with git rebase commands, as the --no-edit flag is not a valid option for git rebase.\n- If there are no changes to commit (i.e., no untracked files and no modifications), do not create an empty commit\n- In order to ensure good formatting, ALWAYS pass the commit message via a HEREDOC, a la this example:\n<example>\ngit commit -m \"$(cat <<'EOF'\n Commit message here.\n\n Co-Authored-By: Claude Opus 4.6 <[email protected]>\n EOF\n )\"\n</example>\n\n# Creating pull requests\nUse the gh command via the Bash tool for ALL GitHub-related tasks including working with issues, pull requests, checks, and releases. If given a Github URL use the gh command to get the information needed.\n\nIMPORTANT: When the user asks you to create a pull request, follow these steps carefully:\n\n1. You can call multiple tools in a single response. When multiple independent pieces of information are requested and all commands are likely to succeed, run multiple tool calls in parallel for optimal performance. run the following bash commands in parallel using the Bash tool, in order to understand the current state of the branch since it diverged from the main branch:\n - Run a git status command to see all untracked files (never use -uall flag)\n - Run a git diff command to see both staged and unstaged changes that will be committed\n - Check if the current branch tracks a remote branch and is up to date with the remote, so you know if you need to push to the remote\n - Run a git log command and `git diff [base-branch]...HEAD` to understand the full commit history for the current branch (from the time it diverged from the base branch)\n2. Analyze all changes that will be included in the pull request, making sure to look at all relevant commits (NOT just the latest commit, but ALL commits that will be included in the pull request!!!), and draft a pull request title and summary:\n - Keep the PR title short (under 70 characters)\n - Use the description/body for details, not the title\n3. You can call multiple tools in a single response. When multiple independent pieces of information are requested and all commands are likely to succeed, run multiple tool calls in parallel for optimal performance. run the following commands in parallel:\n - Create new branch if needed\n - Push to remote with -u flag if needed\n - Create PR using gh pr create with the format below. Use a HEREDOC to pass the body to ensure correct formatting.\n<example>\ngh pr create --title \"the pr title\" --body \"$(cat <<'EOF'\n## Summary\n<1-3 bullet points>\n\n## Test plan\n[Bulleted markdown checklist of TODOs for testing the pull request...]\n\n🤖 Generated with [Claude Code](https://claude.com/claude-code)\nEOF\n)\"\n</example>\n\nImportant:\n- DO NOT use the TodoWrite or Agent tools\n- Return the PR URL when you're done, so the user can see it\n\n# Other common operations\n- View comments on a Github PR: gh api repos/foo/bar/pulls/123/comments","input_schema":{"$schema":"https://json-schema.org/draft/2020-12/schema","type":"object","properties":{"command":{"description":"The command to execute","type":"string"},"timeout":{"description":"Optional timeout in milliseconds (max 600000)","type":"number"},"description":{"description":"Clear, concise description of what this command does in active voice. Never use words like \"complex\" or \"risk\" in the description - just describe what it does.\n\nFor simple commands (git, npm, standard CLI tools), keep it brief (5-10 words):\n- ls → \"List files in current directory\"\n- git status → \"Show working tree status\"\n- npm install → \"Install package dependencies\"\n\nFor commands that are harder to parse at a glance (piped commands, obscure flags, etc.), add enough context to clarify what it does:\n- find . -name \"*.tmp\" -exec rm {} \\; → \"Find and delete all .tmp files recursively\"\n- git reset --hard origin/main → \"Discard all local changes and match remote main\"\n- curl -s url | jq '.data[]' → \"Fetch JSON from URL and extract data array elements\"","type":"string"},"run_in_background":{"description":"Set to true to run this command in the background. Use TaskOutput to read the output later.","type":"boolean"},"dangerouslyDisableSandbox":{"description":"Set this to true to dangerously override sandbox mode and run commands without sandboxing.","type":"boolean"}},"required":["command"],"additionalProperties":false}},{"name":"Glob","description":"- Fast file pattern matching tool that works with any codebase size\n- Supports glob patterns like \"**/*.js\" or \"src/**/*.ts\"\n- Returns matching file paths sorted by modification time\n- Use this tool when you need to find files by name patterns\n- When you are doing an open ended search that may require multiple rounds of globbing and grepping, use the Agent tool instead\n- You can call multiple tools in a single response. It is always better to speculatively perform multiple searches in parallel if they are potentially useful.","input_schema":{"$schema":"https://json-schema.org/draft/2020-12/schema","type":"object","properties":{"pattern":{"description":"The glob pattern to match files against","type":"string"},"path":{"description":"The directory to search in. If not specified, the current working directory will be used. IMPORTANT: Omit this field to use the default directory. DO NOT enter \"undefined\" or \"null\" - simply omit it for the default behavior. Must be a valid directory path if provided.","type":"string"}},"required":["pattern"],"additionalProperties":false}},{"name":"Grep","description":"A powerful search tool built on ripgrep\n\n Usage:\n - ALWAYS use Grep for search tasks. NEVER invoke `grep` or `rg` as a Bash command. The Grep tool has been optimized for correct permissions and access.\n - Supports full regex syntax (e.g., \"log.*Error\", \"function\\s+\\w+\")\n - Filter files with glob parameter (e.g., \"*.js\", \"**/*.tsx\") or type parameter (e.g., \"js\", \"py\", \"rust\")\n - Output modes: \"content\" shows matching lines, \"files_with_matches\" shows only file paths (default), \"count\" shows match counts\n - Use Agent tool for open-ended searches requiring multiple rounds\n - Pattern syntax: Uses ripgrep (not grep) - literal braces need escaping (use `interface\\{\\}` to find `interface{}` in Go code)\n - Multiline matching: By default patterns match within single lines only. For cross-line patterns like `struct \\{[\\s\\S]*?field`, use `multiline: true`\n","input_schema":{"$schema":"https://json-schema.org/draft/2020-12/schema","type":"object","properties":{"pattern":{"description":"The regular expression pattern to search for in file contents","type":"string"},"path":{"description":"File or directory to search in (rg PATH). Defaults to current working directory.","type":"string"},"glob":{"description":"Glob pattern to filter files (e.g. \"*.js\", \"*.{ts,tsx}\") - maps to rg --glob","type":"string"},"output_mode":{"description":"Output mode: \"content\" shows matching lines (supports -A/-B/-C context, -n line numbers, head_limit), \"files_with_matches\" shows file paths (supports head_limit), \"count\" shows match counts (supports head_limit). Defaults to \"files_with_matches\".","type":"string","enum":["content","files_with_matches","count"]},"-B":{"description":"Number of lines to show before each match (rg -B). Requires output_mode: \"content\", ignored otherwise.","type":"number"},"-A":{"description":"Number of lines to show after each match (rg -A). Requires output_mode: \"content\", ignored otherwise.","type":"number"},"-C":{"description":"Alias for context.","type":"number"},"context":{"description":"Number of lines to show before and after each match (rg -C). Requires output_mode: \"content\", ignored otherwise.","type":"number"},"-n":{"description":"Show line numbers in output (rg -n). Requires output_mode: \"content\", ignored otherwise. Defaults to true.","type":"boolean"},"-i":{"description":"Case insensitive search (rg -i)","type":"boolean"},"type":{"description":"File type to search (rg --type). Common types: js, py, rust, go, java, etc. More efficient than include for standard file types.","type":"string"},"head_limit":{"description":"Limit output to first N lines/entries, equivalent to \"| head -N\". Works across all output modes: content (limits output lines), files_with_matches (limits file paths), count (limits count entries). Defaults to 0 (unlimited).","type":"number"},"offset":{"description":"Skip first N lines/entries before applying head_limit, equivalent to \"| tail -n +N | head -N\". Works across all output modes. Defaults to 0.","type":"number"},"multiline":{"description":"Enable multiline mode where . matches newlines and patterns can span lines (rg -U --multiline-dotall). Default: false.","type":"boolean"}},"required":["pattern"],"additionalProperties":false}},{"name":"Read","description":"Reads a file from the local filesystem. You can access any file directly by using this tool.\nAssume this tool is able to read all files on the machine. If the User provides a path to a file assume that path is valid. It is okay to read a file that does not exist; an error will be returned.\n\nUsage:\n- The file_path parameter must be an absolute path, not a relative path\n- By default, it reads up to 2000 lines starting from the beginning of the file\n- You can optionally specify a line offset and limit (especially handy for long files), but it's recommended to read the whole file by not providing these parameters\n- Any lines longer than 2000 characters will be truncated\n- Results are returned using cat -n format, with line numbers starting at 1\n- This tool allows Claude Code to read images (eg PNG, JPG, etc). When reading an image file the contents are presented visually as Claude Code is a multimodal LLM.\n- This tool can read PDF files (.pdf). For large PDFs (more than 10 pages), you MUST provide the pages parameter to read specific page ranges (e.g., pages: \"1-5\"). Reading a large PDF without the pages parameter will fail. Maximum 20 pages per request.\n- This tool can read Jupyter notebooks (.ipynb files) and returns all cells with their outputs, combining code, text, and visualizations.\n- This tool can only read files, not directories. To read a directory, use an ls command via the Bash tool.\n- You can call multiple tools in a single response. It is always better to speculatively read multiple potentially useful files in parallel.\n- You will regularly be asked to read screenshots. If the user provides a path to a screenshot, ALWAYS use this tool to view the file at the path. This tool will work with all temporary file paths.\n- If you read a file that exists but has empty contents you will receive a system reminder warning in place of file contents.","input_schema":{"$schema":"https://json-schema.org/draft/2020-12/schema","type":"object","properties":{"file_path":{"description":"The absolute path to the file to read","type":"string"},"offset":{"description":"The line number to start reading from. Only provide if the file is too large to read at once","type":"number"},"limit":{"description":"The number of lines to read. Only provide if the file is too large to read at once.","type":"number"},"pages":{"description":"Page range for PDF files (e.g., \"1-5\", \"3\", \"10-20\"). Only applicable to PDF files. Maximum 20 pages per request.","type":"string"}},"required":["file_path"],"additionalProperties":false}},{"name":"Edit","description":"Performs exact string replacements in files.\n\nUsage:\n- You must use your `Read` tool at least once in the conversation before editing. This tool will error if you attempt an edit without reading the file. \n- When editing text from Read tool output, ensure you preserve the exact indentation (tabs/spaces) as it appears AFTER the line number prefix. The line number prefix format is: spaces + line number + tab. Everything after that tab is the actual file content to match. Never include any part of the line number prefix in the old_string or new_string.\n- ALWAYS prefer editing existing files in the codebase. NEVER write new files unless explicitly required.\n- Only use emojis if the user explicitly requests it. Avoid adding emojis to files unless asked.\n- The edit will FAIL if `old_string` is not unique in the file. Either provide a larger string with more surrounding context to make it unique or use `replace_all` to change every instance of `old_string`.\n- Use `replace_all` for replacing and renaming strings across the file. This parameter is useful if you want to rename a variable for instance.","input_schema":{"$schema":"https://json-schema.org/draft/2020-12/schema","type":"object","properties":{"file_path":{"description":"The absolute path to the file to modify","type":"string"},"old_string":{"description":"The text to replace","type":"string"},"new_string":{"description":"The text to replace it with (must be different from old_string)","type":"string"},"replace_all":{"description":"Replace all occurrences of old_string (default false)","default":false,"type":"boolean"}},"required":["file_path","old_string","new_string"],"additionalProperties":false}},{"name":"Write","description":"Writes a file to the local filesystem.\n\nUsage:\n- This tool will overwrite the existing file if there is one at the provided path.\n- If this is an existing file, you MUST use the Read tool first to read the file's contents. This tool will fail if you did not read the file first.\n- Prefer the Edit tool for modifying existing files — it only sends the diff. Only use this tool to create new files or for complete rewrites.\n- NEVER create documentation files (*.md) or README files unless explicitly requested by the User.\n- Only use emojis if the user explicitly requests it. Avoid writing emojis to files unless asked.","input_schema":{"$schema":"https://json-schema.org/draft/2020-12/schema","type":"object","properties":{"file_path":{"description":"The absolute path to the file to write (must be absolute, not relative)","type":"string"},"content":{"description":"The content to write to the file","type":"string"}},"required":["file_path","content"],"additionalProperties":false}},{"name":"NotebookEdit","description":"Completely replaces the contents of a specific cell in a Jupyter notebook (.ipynb file) with new source. Jupyter notebooks are interactive documents that combine code, text, and visualizations, commonly used for data analysis and scientific computing. The notebook_path parameter must be an absolute path, not a relative path. The cell_number is 0-indexed. Use edit_mode=insert to add a new cell at the index specified by cell_number. Use edit_mode=delete to delete the cell at the index specified by cell_number.","input_schema":{"$schema":"https://json-schema.org/draft/2020-12/schema","type":"object","properties":{"notebook_path":{"description":"The absolute path to the Jupyter notebook file to edit (must be absolute, not relative)","type":"string"},"cell_id":{"description":"The ID of the cell to edit. When inserting a new cell, the new cell will be inserted after the cell with this ID, or at the beginning if not specified.","type":"string"},"new_source":{"description":"The new source for the cell","type":"string"},"cell_type":{"description":"The type of the cell (code or markdown). If not specified, it defaults to the current cell type. If using edit_mode=insert, this is required.","type":"string","enum":["code","markdown"]},"edit_mode":{"description":"The type of edit to make (replace, insert, delete). Defaults to replace.","type":"string","enum":["replace","insert","delete"]}},"required":["notebook_path","new_source"],"additionalProperties":false}},{"name":"WebFetch","description":"\n- Fetches content from a specified URL and processes it using an AI model\n- Takes a URL and a prompt as input\n- Fetches the URL content, converts HTML to markdown\n- Processes the content with the prompt using a small, fast model\n- Returns the model's response about the content\n- Use this tool when you need to retrieve and analyze web content\n\nUsage notes:\n - IMPORTANT: If an MCP-provided web fetch tool is available, prefer using that tool instead of this one, as it may have fewer restrictions.\n - The URL must be a fully-formed valid URL\n - HTTP URLs will be automatically upgraded to HTTPS\n - The prompt should describe what information you want to extract from the page\n - This tool is read-only and does not modify any files\n - Results may be summarized if the content is very large\n - Includes a self-cleaning 15-minute cache for faster responses when repeatedly accessing the same URL\n - When a URL redirects to a different host, the tool will inform you and provide the redirect URL in a special format. You should then make a new WebFetch request with the redirect URL to fetch the content.\n - For GitHub URLs, prefer using the gh CLI via Bash instead (e.g., gh pr view, gh issue view, gh api).\n","input_schema":{"$schema":"https://json-schema.org/draft/2020-12/schema","type":"object","properties":{"url":{"description":"The URL to fetch content from","type":"string","format":"uri"},"prompt":{"description":"The prompt to run on the fetched content","type":"string"}},"required":["url","prompt"],"additionalProperties":false}},{"name":"WebSearch","description":"\n- Allows Claude to search the web and use the results to inform responses\n- Provides up-to-date information for current events and recent data\n- Returns search result information formatted as search result blocks, including links as markdown hyperlinks\n- Use this tool for accessing information beyond Claude's knowledge cutoff\n- Searches are performed automatically within a single API call\n\nCRITICAL REQUIREMENT - You MUST follow this:\n - After answering the user's question, you MUST include a \"Sources:\" section at the end of your response\n - In the Sources section, list all relevant URLs from the search results as markdown hyperlinks: [Title](URL)\n - This is MANDATORY - never skip including sources in your response\n - Example format:\n\n [Your answer here]\n\n Sources:\n - [Source Title 1](https://example.com/1)\n - [Source Title 2](https://example.com/2)\n\nUsage notes:\n - Domain filtering is supported to include or block specific websites\n - Web search is only available in the US\n\nIMPORTANT - Use the correct year in search queries:\n - The current month is March 2026. You MUST use this year when searching for recent information, documentation, or current events.\n - Example: If the user asks for \"latest React docs\", search for \"React documentation\" with the current year, NOT last year\n","input_schema":{"$schema":"https://json-schema.org/draft/2020-12/schema","type":"object","properties":{"query":{"description":"The search query to use","type":"string","minLength":2},"allowed_domains":{"description":"Only include search results from these domains","type":"array","items":{"type":"string"}},"blocked_domains":{"description":"Never include search results from these domains","type":"array","items":{"type":"string"}}},"required":["query"],"additionalProperties":false}},{"name":"Skill","description":"Execute a skill within the main conversation...","input_schema":{"$schema":"https://json-schema.org/draft/2020-12/schema","type":"object","properties":{"skill":{"description":"The skill name.","type":"string"},"args":{"description":"Optional arguments for the skill","type":"string"}},"required":["skill"],"additionalProperties":false}},{"name":"TaskCreate","description":"Use this tool to create a structured task list...","input_schema":{}},{"name":"TaskGet","description":"Use this tool to retrieve a task by its ID...","input_schema":{}},{"name":"TaskUpdate","description":"Use this tool to update a task...","input_schema":{}},{"name":"TaskList","description":"Use this tool to list all tasks...","input_schema":{}},{"name":"EnterWorktree","description":"Use this tool ONLY when the user explicitly asks to work in a worktree...","input_schema":{}},{"name":"TeamCreate","description":"Create a new team to coordinate multiple agents...","input_schema":{}},{"name":"TeamDelete","description":"Remove team and task directories...","input_schema":{}},{"name":"SendMessage","description":"Send messages to agent teammates...","input_schema":{}},{"name":"CronCreate","description":"Schedule a prompt to be enqueued at a future time...","input_schema":{}},{"name":"CronDelete","description":"Cancel a cron job...","input_schema":{}},{"name":"CronList","description":"List all cron jobs...","input_schema":{}}]That’s over 11,000 tokens burned before the conversation even starts — just the system prompt and built-in tools. And that’s without CLAUDE.md, without MCPs, without any plugins or skills. Those get injected on top:
Auto-injected context: CLAUDE.md + task prompt (~1,000 tokens) view source ↗
<system-reminder>
As you answer the user's questions, you can use the following context:
# claudeMd
Codebase and user instructions are shown below. Be sure to adhere to these instructions. IMPORTANT: These instructions OVERRIDE any default behavior and you MUST follow them exactly as written.

Contents of /Users/robpumpa/Documents/personal/weatherman/CLAUDE.md (project instructions, checked into the codebase):

# Weatherman CLI

Workspace with two binaries: `weatherman` (main CLI) and `generate-report` (benchmarks).

```bash
# Discover weather markets by keyword
cargo run --bin weatherman -- markets search "Paris"

# Inspect a market (by ID or slug) — shows tokens, order book, and config snippet
cargo run --bin weatherman -- markets inspect 1506324

# Run paper trading (market metadata auto-resolved from IDs)
cargo run --bin weatherman -- run -c config.toml

# Show current positions / P&L
cargo run --bin weatherman -- positions
cargo run --bin weatherman -- report

# Generate benchmark report
cargo run --bin generate-report
```

# currentDate
Today's date is 2026-03-09.

      IMPORTANT: this context may or may not be relevant to your tasks. You should not respond to this context unless it is highly relevant to your task.
</system-reminder>

You are implementing Pre-flight Task: Fix Debug vs Display formatting in session.rs

## Task Description

The `orders` table has `CHECK(side IN ('buy', 'sell'))` and `CHECK(tif IN ('GTC', 'GTD', 'FOK'))`. Session.rs currently uses `format!("{:?}", ...)` (Debug) which produces `"Buy"/"Sell"` and `"Gtc"/"Fok"` — these violate the CHECK constraints and silently fail every insert. This MUST be fixed before Phase 3 since we're removing the old position tracking path.

**Files:**
- Modify: `.worktrees/inventory-manager/crates/weatherman/src/session.rs` (lines 262, 265, 380, 415, 451)

**Step 1: Fix all `format!("{:?}", ...)` call sites for side/tif in session.rs**

Change these lines:

```rust
// Line 262: order.side in insert_order
&format!("{:?}", order.side),   →   &order.side.to_string(),

// Line 265: order.tif in insert_order
&format!("{:?}", order.tif),    →   &order.tif.to_string(),

// Line 380: fill.side in insert_fill
&format!("{:?}", fill.side),    →   &fill.side.to_string(),

// Line 415: pos.side in upsert_position
&format!("{:?}", pos.side),     →   &pos.side.to_string(),

// Line 451: fill.side in DecisionSnapshotRecord
intent_side: format!("{:?}", fill.side),   →   intent_side: fill.side.to_string(),
```

**Step 2: Run tests**

Run: `cargo test -p weatherman --lib`
Expected: PASS

**Step 3: Commit**

```
git add crates/weatherman/src/session.rs
git commit -m "fix: use Display instead of Debug for side/tif in DB writes"
```

## Context

This is the first task in the Inventory Manager Phase 3 & 4 plan. It's a pre-flight fix — the Debug formatting bug must be fixed before we remove the old position tracking path in later tasks. The worktree is at `/Users/robpumpa/Documents/personal/weatherman/.worktrees/inventory-manager/` on branch `feature/inventory-manager`.

## Before You Begin

If you have questions about the requirements, approach, or anything unclear — ask now.

## Your Job

1. Implement exactly what the task specifies
2. Run tests to verify
3. Commit your work
4. Self-review
5. Report back

Work from: `/Users/robpumpa/Documents/personal/weatherman/.worktrees/inventory-manager/`

## Before Reporting Back: Self-Review

Review your work. Check: Did I change all 5 call sites? Are there any other `format!("{:?}", ...)` for side/tif I missed? Do all tests pass?

## Report Format

When done, report:
- What you implemented
- What you tested and test results
- Files changed
- Self-review findings (if any)
- Any issues or concerns
Claude Code has a built-in /context command that shows you exactly what’s eating your space:
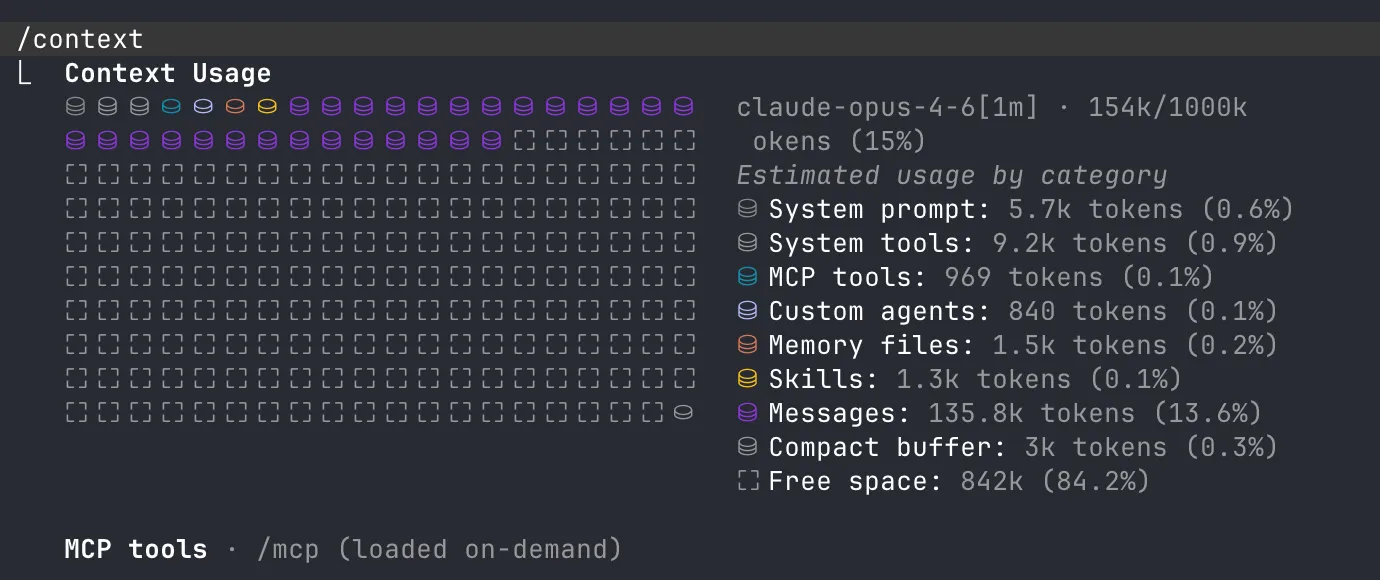
System prompt 5.7k, system tools 9.2k, MCP tools, agents, memory, skills — all loaded before you type anything. You can literally see the fixed cost itemized.
The CLAUDE.md file
The most important file in your repo — and one of the biggest context traps.
CLAUDE.md is loaded into every single conversation. Every token in it costs you context space. And if you use /init from claude to generate it then you fucked up and your whole team is getting worse results because of it.
What goes in CLAUDE.md
Think WHY, WHAT, HOW (HumanLayer has a great writeup on this):
- WHY — what the project does, what the components are for
- WHAT — tech stack, project structure, monorepo layout if applicable
- HOW — how to build, test, run things. Tool choices (bun vs node, cargo vs make)
And stuff Claude consistently gets wrong in your repo. That’s it.
What does NOT go in CLAUDE.md
- Task-specific guidance (database schemas, migration steps) — put these in separate files and let Claude read them when needed
- Style rules — Claude is not an expensive linter. Use actual linters + hooks.
- Code snippets — they go stale. Use
file:linereferences instead.
Research suggests LLMs can reliably follow ~150-200 instructions. Claude’s system prompt already eats ~50. That leaves you maybe 100-150 before quality degrades. Target: under 300 lines, ideally under 60.
Here’s what the difference looks like in practice:
# CLAUDE.md

This file provides guidance to Claude Code (claude.ai/code) when working with code in this repository.

## Project Overview

Minerva is a high-performance trading engine written in Rust with a focus on real-time sports trading, particularly tennis. It uses WebTransport/QUIC for low-latency communication and integrates with Betfair trading APIs and Supabase for real-time data synchronization.

## Key Commands

### Development

- `cargo xtask run` - Run the trading engine locally (requires config.toml)
- `cargo xtask run -r` - Run in release mode for better performance
- `cargo xtask run -c <path>` - Run with custom config file path

### Testing

- `cargo xtask test` - Run all tests using cargo-nextest
- `cargo xtask test --coverage` - Run tests with code coverage (minimum threshold: 85%)
- `cargo xtask test -- [args]` - Pass additional arguments to nextest (e.g., `-- --test-threads=1`)

### Code Quality

- `cargo xtask fmt` - Format all code and fix clippy warnings
- `cargo xtask check` - Run clippy with warnings as errors and check formatting
- `cargo xtask audit` - Security vulnerability scanning
- `cargo xtask deny` - Dependency policy checks
- `cargo xtask unused-deps` - Find unused dependencies

### Documentation

- `cargo xtask doc` - Generate and open documentation
- `cargo xtask typegen` - Generate TypeScript bindings in `crates/models/bindings/`

## Architecture

### Workspace Structure

- `minerva-engine/` - Core trading engine library with session management, strategies, and external API clients
- `minerva/` - Main executable that runs the WebTransport/QUIC server
- `models/` - Shared data models with TypeScript bindings
- `supabase-rpc-agent/` - Supabase broadcast/presence integration
- `synthetic-agent/` - Test agent for simulating trading scenarios
- `xtask/` - Custom build tasks runner

### Core Components

- **Session Manager**: Registry managing trading sessions with lifecycle control (`session_manager.rs`)
- **Trading Strategies**: Tennis-specific strategies using trait-based pattern (`trading_session/strategy/`)
- **WebTransport/QUIC Server**: Dual protocol support with unified connection abstraction (`agent_networking/`)
- **Cron Jobs**: Async task scheduling for game publishing and agent lifecycle (`cron/`)

### Message Passing Architecture

- **Command Channels**: Components communicate via command enums with oneshot response channels
- **RPC Pattern**: Supabase agent uses client-server pattern for database operations
- **Bidirectional Streams**: Trading sessions maintain data feeds with agents
- **Error Classification**: Connection errors distinguish between fatal and recoverable failures

### Key Architectural Patterns

1. **Strategy Pattern**: Pluggable trading strategies via `GenericStrategy` trait
2. **Connection Abstraction**: `AgentConnection` trait unifies WebTransport and QUIC
3. **Session Lifecycle**: Sessions managed through command-based state machine
4. **Task Spawning**: Cron jobs use `JoinSet` with graceful shutdown support
5. **Test Infrastructure**: Mock implementations and test market support for deterministic testing

### External Integrations

- **Betfair API**: Trading and market data access
- **Supabase**: Real-time database, authentication, and broadcast channels
- **WebTransport/QUIC**: Low-latency client-server communication protocols

## Configuration

1. Copy `config.example.toml` to `config.toml`
2. Configure required settings:
   - TCP/UDP/QUIC addresses for server endpoints
   - Supabase credentials and endpoint
   - Betfair credentials in `[[secret_providers]]` section

## Development Guidelines

### Error Handling

- Use `eyre::Result` with `.wrap_err()` for context
- Distinguish fatal vs recoverable errors in connection handling
- Errors in critical components trigger graceful shutdown

### Testing

- Use `rstest` for parameterized tests
- Mock external dependencies (e.g., `MockBetfairConnection`)
- Test markets use `TEST_MARKET_ID_SUFFIX` for identification

### Commit Messages

- Follow conventional commits format
- PR titles must follow conventional format (enforced by CI)
- NEVER use Co-Authored-By statements!
# CLAUDE.md

## Project Overview

Personal blog at blog.pumpurlabs.com, built on Astro (v5) with the Cactus theme. Uses MDX for rich posts, Tailwind CSS v4 for styling.

## Commands

use `bun`

## Architecture

**Content system**: Astro Content Collections with a single `post` collection. Posts live in `src/content/post/` as numbered directories (e.g., `001-asteroids/`, `007-the-multiplayer-game/`). Each directory contains an `index.md` or `index.mdx` file plus co-located images.

**Content schema** (`src/content.config.ts`): Posts require `title` (max 60 chars), `description` (50-160 chars), and `publishDate`. Optional fields: `updatedDate`, `coverImage`, `draft`, `listed`, `tags`, `ogImage`, `series`, `seriesOrder`.

**OG images**: Auto-generated via Satori at `src/pages/og-image/[slug].png.ts` unless a post provides `ogImage` in frontmatter.

**Remotion components**: React-based animated visualizations in `src/components/remotion/` — used as interactive embeds in blog posts via `@astrojs/react`.


## Writing & Content

For any blog writing, editing, or voice/tone work, use the `blog-writer` agent (`.claude/agents/blog-writer.md`). It has the full style guide and knows the author's voice.
For everything that doesn’t belong in CLAUDE.md, use progressive disclosure — separate files that Claude reads on demand:
agent_docs/
 |- building_the_project.md
 |- running_tests.md
 |- database_schema.md
 |- service_architecture.md
Pointers, not copies. Keep CLAUDE.md as the index, not the encyclopedia.
The weird CLAUDE.md escape pragma
Here’s something most people don’t know — CLAUDE.md has weird escape pragmas in the Claude context when it’s being passed to the agent. If you look at the raw auto-injected context from a real session, you’ll see it starts with:
“Codebase and user instructions are shown below. Be sure to adhere to these instructions. IMPORTANT: These instructions OVERRIDE any default behavior and you MUST follow them exactly as written.”
Sounds great, right? Your CLAUDE.md is mandatory! Except scroll to the bottom and you’ll find this gem:
“IMPORTANT: this context may or may not be relevant to your tasks. You should not respond to this context unless it is highly relevant to your task.”
So which is it? “MUST follow exactly as written” or “may or may not be relevant”? In practice, Claude treats this as a soft signal — if the CLAUDE.md content looks relevant to the current task, it’ll follow it. If it looks like bloat that has nothing to do with what the user just asked, it’s got a built-in excuse to skim past it.
So not only does bloat waste tokens, Claude is literally being told it can selectively ignore parts of it. Keep it lean.
MCPs
MCP — Model Context Protocol. Sounds fancy, dead simple. External services expose tools to the model. When you add the Linear MCP, what actually happens:
- Claude Code connects to the Linear MCP server
- The server says “here are my tools” and sends back a list of JSON schemas —
create_issue,list_issues,update_issue,search_issues, etc. - Claude Code takes those schemas and injects them into the system prompt alongside the built-in tools
- From the model’s perspective, there is zero difference between a built-in tool and an MCP tool. They’re all just text descriptions in the prompt.
That’s the whole trick. The model doesn’t know or care where a tool came from — it’s all JSON schemas in a prompt.
The token cost of MCPs
Some MCP servers are slim — Linear exposes ~8 tools (~2,000 tokens). Others are monsters — 40+ tools, easily 8,000+ tokens. That “helpful” MCP that gives you Google Drive, Slack, and email? Might be eating 10,000+ tokens before the conversation starts. And those tokens aren’t free — they’re actively making every response slightly worse.
The useful MCP: your project board
The one MCP I keep on all the time is Linear — but only on one side project where agents fully manage the board. They create tickets, move them through pipeline stages, and update status autonomously. It’s configured in that project’s settings.json so every team member gets it automatically. Worth the ~2k tokens. Full Linear setup in Part 3.
Browser access
You can also give Claude direct access to your web browser via claude --chrome. You’ll need the Claude Web Extension installed — once that’s set up, Claude can read pages, click around, fill forms, take screenshots. It creates a nice UI feedback loop where the agent can see what the user sees, validate its own frontend work, and iterate without you having to describe what’s on screen. Particularly useful for frontend work where “does this look right?” is half the battle.
Why this matters
Everything is text. Everything competes for the same window. The model doesn’t have a separate “tool memory” — it’s all one prompt. Tools and MCPs are the fixed cost. Your job is to minimize that so there’s room for the variable part — the actual work.
Alright so now you know what’s eating your context. Let’s talk about what’s actually worth the token cost — because some of these tools pay for themselves.
Agents, skills, and commands
So what are all these things I keep mentioning — /codex, skills, commands, agents, plugins? The terminology is confusing af and honestly even the official docs aren’t great at explaining the differences. Let me break it down.
What’s the difference
| Commands | Skills | Agents | Plugins | |
|---|---|---|---|---|
| What | Markdown files invoked explicitly (/codex) | Markdown files triggered automatically by context | Subagent definitions with specific tool access | Collections of skills + commands |
| Where | .claude/commands/ | .claude/skills/*/SKILL.md | .claude/agents/ | Installed via /plugin |
| Trigger | Manual (/command-name) | Automatic (Claude infers from context) | Spawned by commands/skills/Claude | /plugin install |
| Example | /research, /codex | linear-plan-tracker, gemini | codebase-analyzer, web-search-researcher | superpowers, skill-creator |
TLDR — they’re all markdown files in your ~/.claude/ or project .claude/ directory. Reusable mini-prompts.
Commands you invoke with a slash — /codex, /research. Skills are ambient — Claude reads them and fires them automatically when relevant (eg linear-plan-tracker moves tickets without you telling it to). Agents get spawned with their own fresh context and specific tool access. Plugins are bundles of all three.
My actual setup
To make this concrete, here’s the full set of skills, commands, and agents I use day to day:
│ ├── codebase-analyzer.md
Traces HOW code works — data flow, architecture, patterns. Outputs structured analysis with file:line references.
view source ↗│ ├── codebase-locator.md
Finds WHERE code lives — a "super grep" for file discovery. Categorizes files by purpose without reading contents.
view source ↗│ ├── codebase-pattern-finder.md
Extracts concrete code examples and existing patterns. Like codebase-locator but also reads files and returns actual snippets.
view source ↗│ ├── web-search-researcher.md
Web research — external docs, crate docs, RFCs, blog posts. Returns findings with citations and direct links.
view source ↗│ └── quant-trading-strategist.md
Domain expert for quantitative trading — strategy design, Polymarket integration, HFT builds, sports betting models. Has its own persistent agent memory.
view source ↗│ ├── codex.md
Routes questions to OpenAI Codex for a second opinion. Claude gathers context, builds the prompt, runs codex, then presents findings with its own counterpoints.
view source ↗│ └── research_codebase.md
The big one — orchestrates all 4 agents in parallel for comprehensive codebase research. Produces a structured markdown document with file references and architecture docs. Originally from HumanLayer.
view source ↗│ └── SKILL.md
Gemini CLI cheat sheet for cross-model validation. Documents flags, common patterns, and troubleshooting.
view source ↗└── SKILL.md
Manages Linear ticket lifecycle in sync with agent work. Moves tickets through Backlog → Design → Implementation → Review → Done.
view source ↗Click any file above to see its full source and download it. All of these are open — steal them, modify them, make them your own.
On top of custom commands and agents, I use a few plugins — bundles of skills, commands, and agents that you install with /plugin:
- superpowers (global) — the meta-prompt plugin. Installs structured workflows for TDD, systematic debugging, brainstorming-before-coding, plan writing/execution, parallel subagent dispatch, and code review. It fundamentally changes how Claude approaches tasks — instead of diving straight into code, it brainstorms first, writes a plan, then executes with verification checkpoints. Install:
/plugin install superpowers@claude-plugins-official. There are other meta-prompt plugins in this space too, like get-shit-done if superpowers isn’t your style. - skill-creator (global) — Anthropic’s official plugin for authoring new skills. When you want to create a skill from scratch, test it with evals, or optimize an existing one. Install:
/plugin install skill-creator@claude-plugins-official. - frontend-design (project-scoped) — Anthropic’s official UI skill. Activates automatically when you ask Claude to build frontend. Steers it away from generic AI aesthetics toward distinctive, production-grade designs by forcing a design direction first. I only enable this on projects where I’m doing UI work. Install:
/plugin install frontend-design@claude-plugins-official.
The two most important commands
/research is the big one. Spawns all 4 agents in parallel — locator finds files, analyzer traces data flow, pattern-finder pulls code examples, web-researcher hits external docs. Results get synthesized into a structured markdown. Here’s the full command:
research_codebase.md — the full research command view source ↗
---
description: Document codebase as-is with comprehensive research
model: opus
---

# Research Codebase

You are tasked with conducting comprehensive research across the codebase to answer user questions by spawning parallel sub-agents and synthesizing their findings.

## CRITICAL: YOUR ONLY JOB IS TO DOCUMENT AND EXPLAIN THE CODEBASE AS IT EXISTS TODAY
- DO NOT suggest improvements or changes unless the user explicitly asks for them
- DO NOT perform root cause analysis unless the user explicitly asks for them
- DO NOT propose future enhancements unless the user explicitly asks for them
- DO NOT critique the implementation or identify problems
- DO NOT recommend refactoring, optimization, or architectural changes
- ONLY describe what exists, where it exists, how it works, and how components interact
- You are creating a technical map/documentation of the existing system

## Initial Setup:

When this command is invoked, respond with:
```
I'm ready to research the codebase. Please provide your research question or area of interest, and I'll analyze it thoroughly by exploring relevant components and connections.
```

Then wait for the user's research query.

## Steps to follow after receiving the research query:

1. **Read any directly mentioned files first:**
   - If the user mentions specific files (docs, configs, TOML, JSON), read them FULLY first
   - **IMPORTANT**: Use the Read tool WITHOUT limit/offset parameters to read entire files
   - **CRITICAL**: Read these files yourself in the main context before spawning any sub-tasks
   - This ensures you have full context before decomposing the research

2. **Analyze and decompose the research question:**
   - Break down the user's query into composable research areas
   - Take time to ultrathink about the underlying patterns, connections, and architectural implications the user might be seeking
   - Identify specific components, patterns, or concepts to investigate
   - Create a research plan using TodoWrite to track all subtasks
   - Consider which directories, files, or architectural patterns are relevant
   - Pay special attention to Rust-specific structures: crates, modules, traits, impls, derive macros, feature flags

3. **Spawn parallel sub-agent tasks for comprehensive research:**
   - Create multiple Task agents to research different aspects concurrently
   - We now have specialized agents that know how to do specific research tasks:

   **For codebase research:**
   - Use the **codebase-locator** agent to find WHERE files and components live
     - Look for `Cargo.toml`, `lib.rs`, `main.rs`, `mod.rs` files to understand crate/module structure
     - Search `*.rs` files, `build.rs`, `.cargo/config.toml`
   - Use the **codebase-analyzer** agent to understand HOW specific code works (without critiquing it)
     - Focus on trait definitions, impl blocks, type aliases, error types, and module hierarchies
   - Use the **codebase-pattern-finder** agent to find examples of existing patterns (without evaluating them)
     - Look for common Rust patterns: builder pattern, newtype pattern, From/Into impls, error handling patterns, async patterns

   **IMPORTANT**: All agents are documentarians, not critics. They will describe what exists without suggesting improvements or identifying issues.

   **For web research (use when external context would help):**
   - Use the **web-search-researcher** agent for external documentation, crate docs, RFCs, blog posts, and resources
   - Spawn web research agents proactively when the topic involves external crates, Rust language features, or ecosystem patterns
   - Instruct them to return LINKS with their findings, and please INCLUDE those links in your final report

   The key is to use these agents intelligently:
   - Start with locator agents to find what exists
   - Then use analyzer agents on the most promising findings to document how they work
   - Run multiple agents in parallel when they're searching for different things
   - Each agent knows its job - just tell it what you're looking for
   - Don't write detailed prompts about HOW to search - the agents already know
   - Remind agents they are documenting, not evaluating or improving

4. **Wait for all sub-agents to complete and synthesize findings:**
   - IMPORTANT: Wait for ALL sub-agent tasks to complete before proceeding
   - Compile all sub-agent results
   - Connect findings across different crates, modules, and components
   - Include specific file paths and line numbers for reference
   - Highlight patterns, connections, and architectural decisions
   - Answer the user's specific questions with concrete evidence
   - Document trait relationships, generic type parameters, and lifetime annotations where relevant

5. **Generate research document:**
   - Structure the document with content:
     ```markdown
     # Research: [User's Question/Topic]

     **Date**: [Current date and time]
     **Git Commit**: [Current commit hash]
     **Branch**: [Current branch name]

     ## Research Question
     [Original user query]

     ## Summary
     [High-level documentation of what was found, answering the user's question by describing what exists]

     ## Crate & Module Structure
     [Workspace layout, crate dependencies, module tree relevant to the research]

     ## Detailed Findings

     ### [Component/Area 1]
     - Description of what exists (file.rs:line)
     - How it connects to other components
     - Current implementation details (without evaluation)
     - Key traits, types, and impls involved

     ### [Component/Area 2]
     ...

     ## Code References
     - `path/to/file.rs:123` - Description of what's there
     - `another/module/mod.rs:45-67` - Description of the code block

     ## Architecture Documentation
     [Current patterns, conventions, and design implementations found in the codebase]
     - Error handling approach (thiserror, anyhow, custom Result types)
     - Async runtime usage (tokio, async-std, etc.)
     - Serialization patterns (serde derives, custom impls)
     - Feature flag organization

     ## Open Questions
     [Any areas that need further investigation]
     ```

6. **Add GitHub permalinks (if applicable):**
   - Check if on main branch or if commit is pushed: `git branch --show-current` and `git status`
   - If on main/master or pushed, generate GitHub permalinks:
     - Get repo info: `gh repo view --json owner,name`
     - Create permalinks: `https://github.com/{owner}/{repo}/blob/{commit}/{file}#L{line}`
   - Replace local file references with permalinks in the document

7. **Present findings:**
   - Present a concise summary of findings to the user
   - Include key file references for easy navigation
   - Ask if they have follow-up questions or need clarification

8. **Handle follow-up questions:**
   - If the user has follow-up questions, append to the same research document
   - Add a new section: `## Follow-up Research [timestamp]`
   - Spawn new sub-agents as needed for additional investigation

## Important notes:
- Always use parallel Task agents to maximize efficiency and minimize context usage
- Always run fresh codebase research - never rely solely on existing research documents
- Focus on finding concrete file paths and line numbers for developer reference
- Research documents should be self-contained with all necessary context
- Each sub-agent prompt should be specific and focused on read-only documentation operations
- Document cross-component connections and how systems interact
- Link to GitHub when possible for permanent references
- Keep the main agent focused on synthesis, not deep file reading
- Have sub-agents document examples and usage patterns as they exist
- **CRITICAL**: You and all sub-agents are documentarians, not evaluators
- **REMEMBER**: Document what IS, not what SHOULD BE
- **NO RECOMMENDATIONS**: Only describe the current state of the codebase
- **File reading**: Always read mentioned files FULLY (no limit/offset) before spawning sub-tasks
- **Rust-specific guidance**:
  - Explore `Cargo.toml` and `Cargo.lock` for dependency graphs
  - Map out workspace members when in a workspace
  - Document `pub` visibility boundaries between modules
  - Note `#[cfg(...)]` conditional compilation and feature gates
  - Track `use` imports to understand module dependency flow
  - Identify key derive macros and proc macros in use
  - Document unsafe blocks and their safety invariants
  - Note any FFI boundaries (`extern "C"`, `#[no_mangle]`)
- **Critical ordering**: Follow the numbered steps exactly
  - ALWAYS read mentioned files first before spawning sub-tasks (step 1)
  - ALWAYS wait for all sub-agents to complete before synthesizing (step 4)
  - NEVER write the research document with placeholder values
/codex is the cross-model play. You don’t write the Codex prompt — Claude does. Claude knows what it found and what needs a second look. Let the models talk to each other. Command file:
codex.md — the full command file view source ↗
# Codex Second Opinion

Get a second opinion from OpenAI Codex on any question about this codebase — debugging, analysis, architecture, code review, or anything else.

## Arguments

The user's request is: $ARGUMENTS

## Instructions

Your job is to gather the right context, build a prompt that gives Codex enough understanding of this codebase to be useful, and then run `codex exec` with that prompt. Codex has zero knowledge of this codebase, so the context you provide is everything.

### Step 1: Gather Context

Read the Architecture Overview section of `CLAUDE.md` for a high-level understanding. Then, based on what the user is asking about, selectively read the files that are most relevant. Use these heuristics:

- **If actor services are involved**: read the service's message types and the `ServiceSenders`/`ServiceReceivers` pattern
- **If types crate is involved**: check wire formats (`BlockBody`, `BlockHeader`, `DataTransactionHeader`)
- **If consensus/mining is involved**: read the VDF + PoA section and shadow transaction patterns
- **If p2p is involved**: check gossip protocol routes and circuit breaker usage
- **If storage/packing is involved**: check chunk size constants and XOR packing invariants
- **If reth integration is involved**: check CL/EL boundary and payload building flow

If the user's request references specific files, diffs, or branches, read those too. Keep context focused — aim for 3-5 key files maximum.

### Step 2: Build the Prompt

Construct a single prompt string that includes:

1. **Architecture summary** — 2-3 sentences describing the relevant components and how they fit together
2. **Key conventions** — patterns that apply (e.g., "custom Tokio channel-based actor system, not Actix", "crypto crates compiled with opt-level=3")
3. **Relevant code** — inline the key snippets or file contents that Codex needs to see
4. **The user's request** — what they actually want Codex to analyze

### Step 3: Run Codex

```bash
codex exec --sandbox read-only "<constructed prompt>"
```

Run this in the background with a 300s timeout.

### Step 4: Monitor Progress

After launching codex in the background:

1. Wait ~30 seconds, then check the background task output using `TaskOutput` with `block: false`.
2. If there is new output, give the user a brief progress update.
3. Repeat every ~30 seconds.
4. If no new output appears for 60+ seconds and the task hasn't completed, warn the user that codex may be stuck and offer to kill it.

### Step 5: Present Results

Once codex finishes:

1. **Summary**: Concise summary of key findings, organized by category (only include categories with findings):
   - Bugs and logic errors
   - Security concerns
   - Concurrency / actor system issues
   - Code quality and style
   - Performance considerations

2. **Raw output**: Complete codex output in a fenced code block.

3. **Counterpoints**: If you (Claude) disagree with any findings or think something was missed, add a "Claude's take" section. Only include this if you have a meaningful counterpoint.

### Error Handling

- If `codex` is not found, tell the user to install it: `npm install -g @openai/codex`
- If codex times out (5 minutes), show whatever partial output was captured and note the timeout
How to create your own
When you find yourself repeating the same instructions, or you have debugging approaches or domain knowledge worth sharing across the team — whip it into a skill or command. Claude will tell you which one is more appropriate.
“Did you write that codex.md yourself?” — No. The skill-creator plugin mentioned above is literally built for this. Claude wrote the codex.md itself with my guidance. To install any plugin, run /plugin in Claude Code and browse the menu, or just ask Claude “hey install skill-creator from claude-plugins-official” and it’ll do it for you.
Brainstorming
Random thing: one of the most useful items from the claude superpowers plugin has been “brainstorming”. Just prompt “let’s brainstorm about xyz” and it will turn on the skill. It creates a very nice feedback loop session where it will proactively research the codebase and discuss solutions with you, making it a nice interactive session. Kinda like the normal plan mode but I think its a bit more free-form setup. Pair it together with codex-cli review (that Claude invokes so it can craft the prompt) when you feel that something is amiss, it creates a very nice back-and-forth loop.
Making your codebase agent-friendly
Before you throw agents at your repo, clean up the stuff your tech lead has been nagging about since forever:
- Name files after what they do. 47 files called
mod.rsmeans agents burn context just figuring out which one they need.pd_service.rs>mod.rs.MarketDashboard.tsx>page.tsx. - Pick one naming convention and stick to it.
session_idin one place,sessionIdin another,sess_idin a third? Congratulations, you’ve tripled the search space for every agent and every human. - Clear separation of concerns. Same as always. Nothing new here.
The funny thing is — “agent-friendly” just means “don’t have crap patterns.” The difference is that now there’s a measurable cost to ignoring it: your agents get dumber and burn more tokens.